This post will be the continuation/longer post of the my VSCOCam editing tutorial, I feel like I need to make an update simply because I really want to share you guys how I’ve been editing my Instagram pictures lately, well to be honest, generally I still stick to my own personal style, only I tweak the editing here and there, aside the fact how this matter has become one of the frequently asked questions on my social media channels!
Anyway, yesterday was the NATIONAL BLOGGERS DAY!!! So to all Indonesian bloggers, cheers to every single one of you! I hope this post can also inspire you guys.
Please note that just because I write this post and share a tutorial for you, doesn’t mean that my style is the best among all, no such thing as THE BEST style, nor such thing as THE BEST blogger. Another purpose of me writing this post is to help those who’ve been constantly asking me to do a tutorial.WHAT TO REMEMBEREveryone has their own thoughts about photo editing, but personally for me, editing should have the purpose of supporting what initially is a good picture on the first place, instead of changing everything about it. I like to keep my picture editing very simple and kinda clean, and I don’t go crazy with all the major editing and stuff, because I think what’s most important about a picture is “the soul” and that’s something that became sort of our “signature”. I know it’s hard to explain, but let’s put it this way: if we see our friends/people we follow on Instagram and whenever they post something so simple like photo of streets, signages, people, or those coffee shop photos, and just no matter how messy it is, when you look at it you know that is one good picture, and their mess is "a beautiful mess", if you follow @alice_gao or @linda_lomelino, you’ll probably understand what I mean, there’s this massive soul about their pictures because they know how they want their picture want to turn out, they have good eyes, they know the lighting, and those elements should be the main ideas, so yeah, a good clear picture with soulis mandatory.
Sometimes I wish I can shoot just like them, but I know I can’t so I’ll just stick to my own style.
EDITING APPLICATION:I edit the majority (or almost all) of my pictures using VSCOCam, their photo filters are probably the ones closest to my liking (and I own them all), and the style of my picture. The secondary/supporting app would be Snapseed. I use Snapseed for their fabulous “selective adjust” feature where you can highlight certain parts of your picture, the other awesome thing I love about Snapseed more than VSCOCam is when it comes to the basic adjustment such as brightness, contrast, temperature and stuff. In Snapseed, you can do the adjustment in a very detailed and customized value, whereas VSCOCam uses the 20% stop, even though that’s not a main problem for me, but sometimes it does change the mood of my picture, short to say: VSCOCam and Snapseed are made to complement one another!
I think you can relate to what I am going to say: if you’ve been editing so many pictures in your life, when you look at a raw and unedited picture files, you’ll have this picture in your head of how you want your picture to turn out: the color, the contrast, the shadow, and everything. As surreal as it might sound, it’s like you already have the visualization of the edited picture somewhere in your mind, but please be open to explore your photo editing app as sometimes the result can surprise you!
While my first VSCOCam editing tutorial emphasized more on the food photo editing, the truth is, I don’t always post food pictures, sometimes when I am travelling, I like to post landscape/architecture pictures, as well as... selfies! Yes I have a tutorial for that as well!
Enough yakking, let’s just start of the tutorial yay!
COLORFUL DRINK WITH WARM OUTDOOR LIGHTINGI took this picture while I was in Bali waiting for the gorgeous sunset at Jimbaran, anyway, this drink is colorful and the lighting was mild-warm, and I know I want to keep the editing very minimal, easy and clean. I think 80% of my pictures are edited with the “A6” filter by VSCOCam, I personally think this filter is very versatile as you can almost apply it in every situation (low light, outdoor, indoor, landscape, portraits, etc.)The “skin tone” feature is very sensitive towards orange-yellow hue, and this picture happens to be just the perfect example, I swear I didn’t plan on using this picture. When you move the bar to the left, the hue’s going to be more orange, and when you move the bar to the right, the hue’s going to appear more yellow. I move the bar one stop to the right, it might not be exactly visible but I like it that way.
Gave a little hint of tint, the thing about “tint” is when you move the bar to the left, your photo midtone will appear “greener” and “more purple” on the opposite. I want to balance out the tone with a little +1 hint fix, again it’s not clearly visible here, but it might on your phone’s screen. You know sometimes you give this little details just to make you feel more assured.
Basically that’s everything!
OUTDOOR LUNCHBesides “A6”, the second most used VSCOCam filter would be the “S3” filter, I love how this filter naturally have the tendency to brighten your picture while slightly saturating, and softening it a bit. I had a delicious Spring Chicken for lunch, and when I captured this picture, I actually noticed that I like the picture already, the chicken was the main focus and the surrounding was clean with a little pop of color from the greens and veges, and I knew exactly that I wanted this picture to be edited with the “S3” filter by VSCOCam.
The “S” filter works very well with white background and white-clean pictures, it will give you this minimal and soft result.
Here’s a tip for you: most of my top shot photos with plain white or wood background are edited with S2/S3 filter. You can check out @agiasidi or @leonardstevany on Instagram, to me they are the iPhone top shot experts!
FOOD INDOOR
As a food blogger, I meet different restaurants with various kinds of lighting, and much often I am faced with places with very bad lighting, sometimes they’re even so mixed and dark, so my suggestion on the first place would be for you to scan the restaurant and find the spot with the best lighting. This picture was actually taken today! Mall’s lighting has never been my favorite, as you can capture different kinds of lights from your surrounding, but hey, don’t call me Hans if I can’t fix this #majorLOL
So for Instagram, I usually like the 1:1 ratio, even though Instagram has allowed the 3:2 and 4:5 ratio, personally, I will still crop my picture to square format #squaresquad, so I did a little cropping and my ultimate filter to the rescue for indoor pictures: “A6” and “E5”, but since I’ve showed you the “A6”, let’s play around with the “E5”. I set the strength on the maximum level.As I found the picture a little soft for my liking, I enchance the contrast to one stop, and I set the temperature to “-1” to make it appear less warm.
I still find the picture a little “purple”, so I set the tint to “-1” to reduce the purple tone, and set the highlight “+1” to soften the look.
You can actually skip my skin tone part, but as I want to see more details on my picture, I set the clarity to “+1”, thank God VSCOCam finally release this feature!
Normally when I set my object on the center, I give a little vignette on the side to make the object pop!
Final result after VSCOCam editing, but I found this picture to lack that “main focus”, I wanted to highlight the color of the ice cream, and yes it’s time for Snapseed to come to the rescue! Using their Selective Adjust feature and place the dots on the ice cream and biscuit and play around with the brightness and saturation!
VOILA now I am satisfied!
SELFIES
I ALWAYS use the E5 filter for my selfies! I love how this filter has this faded violet-ish, purple-ish, peach-ish and pink-ish tone blend and I found that perfect for selfies, in a way it makes your skin appear smoother, cleaner and brighter. Is it? I don’t know maybe it’s just me :p.
Enhance the clarity to show the details!
BUT AGAIN, this is just how I usually edit my pictures you don’t have to agree hahaha! If you love portraits and “E5” filter, do check @andrewyaputra’s Instagram feed, he’s the E5 master, all of his pictures are edited using this filter.
MIRROR SELFIE (INDOOR)Took this mirror selfie in my hotel room bathroom! Normally the lights in hotel room are yellow & warm, and I love to turn it down by balancing it on the temperature and using filters with blue undertone such as “A5” or what I am using for this picture, “HB1”.Because I want to convert this picture to appear a little more vintage, then I need that “green” shadow layered on top, two stops would be very enough for my liking.
...and don’t forget... grains!
Final result
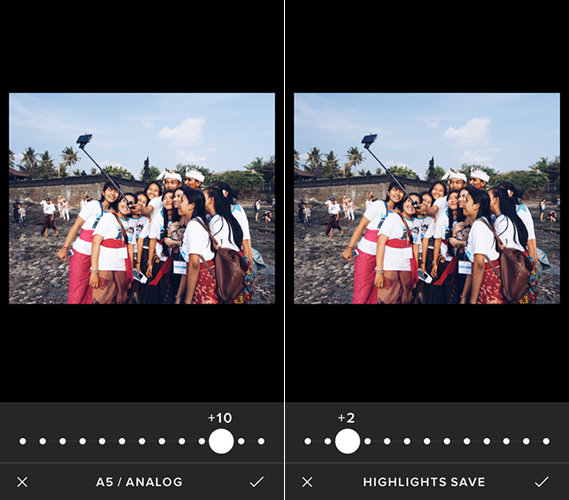
PEOPLEThere are TONS of conditions regarding this as everywhere you go, you’ll see different types of people and different setting, but let’s take these two pictures as the samples. I took a candid picture of these kids in Tanah Lot Bali when they were taking selfies using the selfie stick. I initially wanted to use the “A6” or “E5” filter (with adjustments) on VSCOCam, but in a glance, I know I can have fun with different filter, so I opted for the A5 on that ver first tap and I was surprised with the result. I LOVE IT.
Nice pop of color and their skin tone looks good here, contrast but not overpowered!
Talk about exploring the filters and have fun, sometimes staying out of your comfort zone could lead to be surprised.
PEOPLE AND BACKLITI seriously envy the people who live in countries like Japan, Europe or UK for the light, clear sky, and the naturally photogenic city for pictures! I took this picture in Dalston Street Feast London and this was a 8:30 PM situation. I love that backlight with mist & smoke at the background, and I don’t know about you, but normally when I see pictures with “smokes”, I know I wanna have so much fun with colors! Something about smoke and its movement that’s just so sexy! This picture was originally slightly underexposed, but I like it how it was and the heavy shadow surrounding would be perfect for “HB2” or most of the “P” filters, especially “P5” for its cold and polaroid undertone resulting this mysterious look.Did a little cropping on the unwanted area, and to enchance that moody look, I underexpose the picture to two stops below, that’s 40% darker.P5 FILTER!
A layer of red shadow (level 2) and you’re pretty much done! Final picture edited using P5 filter.
With the same adjustments, you can play around with these filters as well!H2
HB2
M5
SEAYou cannot have too much blue, at least that’s what I think about the color of the sky and the sea, when I deal with pictures of sea or sky, I know I just want to tweak the picture so that they’ll appear very blue, normally I would edit my sea and sky pictures using the “HB2” filter, “Q4” filter, “S2” filter (sometimes with +1/+2 saturation), or “A8” when I wanted a little fade and mood to my picture.
Very simple, right?
I will definitely update more tips and tricks on how I usually edit my Instagram pictures, I hope this post, in a way, helps you with your wonders about my picture editing, but truthfully, I really want you guys to develop your own style and show them to me, what if we just inspire one another? J
If you have any questions or suggestions on the type of picture editing you want me to do, drop them on the comment bar below!
Thank you very much for reading!
FIND ME HERE